Butterfly 不改动主题源码实现自定义侧边栏
|字数总计:2.6k|阅读时长:13分钟|阅读量:
侧边栏是 Butterfly 主题的一大功能亮点,在 Butterfly 3.8.0 版本前是不支持自定义侧边栏的,只能通过魔改实现。这也因此诞生了许多优质的魔改教程,效果也很惊艳,比如 Heo 收录的:侧边栏 | Butterfly 主题美化教程 (zhheo.com)。
Butterfly 3.8.0 以后,主题支持自定义侧边栏,这也使我们可以通过不修改主题源码的方式自定义想要的侧边栏。(主题官方文档参考:自定義側邊欄 | Butterfly)
授人以鱼不如授人以渔。本篇文章将以这个特性为基础,结合 CodePen 中的项目,以三个例子展示定制侧边栏过程:
- 小风车:这是对主题官方文档示例的举一反三,提供与 CodePen 项目结合的思路。
- Crowd Simulator 人潮涌动模拟器:引入 CSS 文件去掉侧边栏容器的边框,嵌入 iframe 页面
- Car 小汽车:上例的举一反三
本人前端水平有限,欢迎各位博主互相交流!
小风车
首先,在 Trending - CodePen 找到自己想要的小组件,以小风车为例 Windmill (codepen.io),进入代码编辑界面,里面有 HTML 代码和 CSS 代码。
引入 CSS
点击代码框右上小箭头,编译 css 文件:
复制里面的的代码到新文件 windmill.css。并将该 CSS 文件引入主题中。Butterfly 主题的方法为在主题配置文件的 inject 部分引入 CSS,如:
1
2
3
4
5
| inject:
head:
- <link rel="stylesheet" href="your css">
bottom:
- <script src="your js"></script>
|
删除不必要代码(否则导致博客异常)并稍微修改一下类选择器(以防万一):
1
2
3
4
5
6
7
8
9
10
11
12
13
14
15
16
17
18
19
20
21
22
23
24
25
26
27
28
29
30
31
32
33
34
35
36
37
38
39
40
41
42
| - *,
- *:before,
- *:after {
- ...
- }
- body {
- ...
- }
- .inspiration {
- ...
- }
- .center {
- ...
- }
- @media screen and (max-height: 500px) {
- ...
- }
+ /* 这是为了让svg居中 */
+ .windmill {
+ display: flex;
+ align-items: center;
+ justify-content: center;
+ }
+ /* 以下关于svg类选择器加上.windmill */
- svg {
+ svg.windmill {
overflow: visible;
}
- svg .blades {
+ svg .blades.windmill {
...
}
- svg .clouds path:nth-child(1) {
+ svg .clouds.windmill path:nth-child(1) {
...
}
- svg .clouds path:nth-child(2) {
+ svg .clouds.windmill path:nth-child(2) {
...
}
...
|
只提取代码中第一个 div 元素,并对相关元素增加 windmill 类:
1
2
3
4
5
6
7
8
9
10
11
12
13
14
15
| -<div class="center">
+<div class="windmill">
- <svg xmlns="http://www.w3.org/2000/svg" viewBox="615.66 311.71 271.03 207.66" width="271.03" height="207.66">
- <g class="clouds" fill="none" stroke-width="3" stroke="#BED3CF" stroke-linejoin="round" stroke-linecap="round" stroke-miterlimit="3">
+ <svg class="windmill" xmlns="http://www.w3.org/2000/svg" viewBox="615.66 311.71 271.03 207.66" width="271.03" height="207.66">
+ <g class="clouds windmill" fill="none" stroke-width="3" stroke="#BED3CF" stroke-linejoin="round" stroke-linecap="round" stroke-miterlimit="3">
...
</g>
...
- <g class="blades" fill="#FFF" stroke-width="3" stroke="#4A5370" stroke-linejoin="round" stroke-miterlimit="3">
+ <g class="blades windmill" fill="#FFF" stroke-width="3" stroke="#4A5370" stroke-linejoin="round" stroke-miterlimit="3">
...
</g>
</svg>
</div>
|
在 widget.yml 中是这样的:
注意 YAML 文件中的缩进!否则会报这样的错误:
1
| can not read a block mapping entry; a multiline key may not be an implicit key
|
Crowd Simulator 人潮涌动模拟器
逛了许多博主的网站,发现了这个卡片:Crowd Simulator (codepen.io)。想尝试一下是不是可以放到侧边栏,试了一晚上成功了。现分享步骤。
新建 HTML 文件
1
2
3
4
5
6
7
8
9
10
11
12
13
14
15
16
17
18
19
20
21
22
23
24
25
26
27
28
29
30
31
32
33
34
35
36
37
38
39
40
41
42
43
44
45
46
47
48
49
50
51
52
53
54
55
56
57
58
59
60
61
62
63
64
65
66
67
68
69
70
71
72
73
74
75
76
77
78
79
80
81
82
83
84
85
86
87
88
89
90
91
92
93
94
95
96
97
98
99
100
101
102
103
104
105
106
107
108
109
110
111
112
113
114
115
116
117
118
119
120
121
122
123
124
125
126
127
128
129
130
131
132
133
134
135
136
137
138
139
140
141
142
143
144
145
146
147
148
149
150
151
152
153
154
155
156
157
158
159
160
161
162
163
164
165
166
167
168
169
170
171
172
173
174
175
176
177
178
179
180
181
182
183
184
185
186
187
188
189
190
191
192
193
194
195
196
197
198
199
200
201
202
203
204
205
206
207
208
209
210
211
212
213
214
215
216
217
218
219
220
221
222
223
224
225
226
227
228
229
230
231
232
233
234
235
236
237
238
239
240
241
242
243
244
245
246
247
248
249
250
251
252
253
254
255
256
257
258
259
260
261
262
263
264
265
266
267
268
269
270
271
| <!DOCTYPE html>
<html lang="en">
<head>
<meta charset="UTF-8">
<title>人潮汹涌 Crowd Simulator</title>
<link rel="stylesheet" href="/css/people.css">
</head>
<body><canvas id="canvas"></canvas>
<script src="https://cdnjs.cloudflare.com/ajax/libs/gsap/3.9.1/gsap.min.js"></script>
</body>
<style>
body,
html {
height: 100%;
background-color: #fff
}
body {
margin: 0
}
#canvas {
width: 100%;
height: 100%
}
body::-webkit-scrollbar {
display: none
}
</style>
<script>
const config = {
src:
"https://s3-us-west-2.amazonaws.com/s.cdpn.io/175711/open-peeps-sheet.png",
rows: 15,
cols: 7
};
const randomRange = (min, max) => min + Math.random() * (max - min);
const randomIndex = (array) => randomRange(0, array.length) | 0;
const removeFromArray = (array, i) => array.splice(i, 1)[0];
const removeItemFromArray = (array, item) =>
removeFromArray(array, array.indexOf(item));
const removeRandomFromArray = (array) =>
removeFromArray(array, randomIndex(array));
const getRandomFromArray = (array) => array[randomIndex(array) | 0];
const resetPeep = ({ stage, peep }) => {
const direction = Math.random() > 0.5 ? 1 : -1;
const offsetY = 100 - 250 * gsap.parseEase("power2.in")(Math.random());
const startY = stage.height - peep.height + offsetY;
let startX;
let endX;
if (direction === 1) {
startX = -peep.width;
endX = stage.width;
peep.scaleX = 1;
} else {
startX = stage.width + peep.width;
endX = 0;
peep.scaleX = -1;
}
peep.x = startX;
peep.y = startY;
peep.anchorY = startY;
return {
startX,
startY,
endX
};
};
const normalWalk = ({ peep, props }) => {
const { startX, startY, endX } = props;
const xDuration = 10;
const yDuration = 0.25;
const tl = gsap.timeline();
tl.timeScale(randomRange(0.5, 1.5));
tl.to(
peep,
{
duration: xDuration,
x: endX,
ease: "none"
},
0
);
tl.to(
peep,
{
duration: yDuration,
repeat: xDuration / yDuration,
yoyo: true,
y: startY - 10
},
0
);
return tl;
};
const walks = [normalWalk];
class Peep {
constructor({ image, rect }) {
this.image = image;
this.setRect(rect);
this.x = 0;
this.y = 0;
this.anchorY = 0;
this.scaleX = 1;
this.walk = null;
}
setRect(rect) {
this.rect = rect;
this.width = rect[2];
this.height = rect[3];
this.drawArgs = [this.image, ...rect, 0, 0, this.width, this.height];
}
render(ctx) {
ctx.save();
ctx.translate(this.x, this.y);
ctx.scale(this.scaleX, 1);
ctx.drawImage(...this.drawArgs);
ctx.restore();
}
}
const img_crowd = document.createElement("img");
img_crowd.onload = init;
img_crowd.src = config.src;
const canvas = document.querySelector("#canvas");
const ctx = canvas.getContext("2d");
const stage = {
width: 0,
height: 0
};
var allPeeps = [];
const availablePeeps = [];
const crowd = [];
function init() {
createPeeps();
resize();
gsap.ticker.add(render);
window.addEventListener("resize", resize);
}
function createPeeps() {
const { rows, cols } = config;
const { naturalWidth: width, naturalHeight: height } = img_crowd;
const total = rows * cols;
const rectWidth = width / rows;
const rectHeight = height / cols;
for (let i = 0; i < total; i++) {
allPeeps.push(
new Peep({
image: img_crowd,
rect: [
(i % rows) * rectWidth,
((i / rows) | 0) * rectHeight,
rectWidth,
rectHeight
]
})
);
}
}
function resize() {
stage.width = canvas.clientWidth;
stage.height = canvas.clientHeight;
canvas.width = stage.width * devicePixelRatio;
canvas.height = stage.height * devicePixelRatio;
crowd.forEach((peep) => {
peep.walk.kill();
});
crowd.length = 0;
availablePeeps.length = 0;
availablePeeps.push(...allPeeps);
initCrowd();
}
function initCrowd() {
while (availablePeeps.length) {
addPeepToCrowd().walk.progress(Math.random());
}
}
function addPeepToCrowd() {
const peep = removeRandomFromArray(availablePeeps);
const walk = getRandomFromArray(walks)({
peep,
props: resetPeep({
peep,
stage
})
}).eventCallback("onComplete", () => {
removePeepFromCrowd(peep);
addPeepToCrowd();
});
peep.walk = walk;
crowd.push(peep);
crowd.sort((a, b) => a.anchorY - b.anchorY);
return peep;
}
function removePeepFromCrowd(peep) {
removeItemFromArray(crowd, peep);
availablePeeps.push(peep);
}
function render() {
canvas.width = canvas.width;
ctx.save();
ctx.scale(devicePixelRatio, devicePixelRatio);
crowd.forEach((peep) => {
peep.render(ctx);
});
ctx.restore();
}
</script>
</html>
|
这个 HTML 模板很简单:
1
2
3
| body::-webkit-scrollbar {
display: none
}
|
- js 做了写优化(我调错调试出来的)
- 引入其他 js:gsap.min.js
- 改了一个变量名:img->img_crowd 防冲突
将新建的 HTML 放到你博客目录 Sourse 文件夹下的合适位置。这里我单独放到 DO_NOT_render 文件夹下,以便后续设置 Hexo 忽略对该文件夹的渲染。注意 DO_NOT_render 文件夹是 sourse 的子文件夹。
在 _config.yaml 中设置禁止渲染:
1
2
| skip_render:
- DO_NOT_render/people.html
|
引入 CSS
Butterfly 主题配置文件 inject 以下 CSS:
1
2
3
4
5
6
7
8
9
10
11
12
13
14
15
16
17
18
19
20
21
22
23
24
25
26
27
28
29
30
31
32
33
34
35
36
37
38
39
40
41
42
| #effect_shade{
height: 200px;
background-color: var(--lyx-white-acrylic1)!important;
border-radius: 8px;
font-family: PingFang,微软雅黑,HYTMR,SimSun;
background-size:cover;
color: #00000000;
font-size:40px;
position: relative;
}
#effect_shade-banner{
width:100%!important;
height:100%!important;
border-radius:8px;
}
#effect_shade-hover{
position:absolute;
right:0%;
height:100%!important;
color:var(--lyx-0);
border-radius: 8px;
padding-left: 5%;
padding-top: 5%;
}
#effect_shade-hover:hover{
color:#ffffff;
background-color: #669900dd;
backdrop-filter: blur(10px) saturate(180%);
-webkit-backdrop-filter: blur(10px) saturate(180%);
}
.seamless-card{
padding: 0px!important;
}
.seamless-card .item-headline{
padding-bottom: 0px!important;
height: 0px!important;
}
|
从上面的 CSS 中注意到:
1
2
3
4
5
6
7
8
|
.seamless-card{
padding: 0px!important;
}
.seamless-card .item-headline{
padding-bottom: 0px!important;
height: 0px!important;
}
|
这是为了覆盖 Butterfly 主题侧边栏样式,实现对目标侧边栏卡片进行调整,达到无缝的效果。这部分也可以独立出一个 css 样式文件出来。
再次提醒
关于自定义侧边栏(widget.yml)信息详看 Butterfly 主题官方文档 自定義側邊欄 | Butterfly
1
2
3
4
5
6
7
8
9
10
11
12
13
| top:
- class_name: seamless-card
id_name:
name:
icon:
order:
html: |
<div id="effect_shade">
<iframe id="effect_shade-banner" src="/DO_NOT_render/people.html" frameborder="no"></iframe>
<a id="effect_shade-hover" style="width:100%;height:auto;" href="javascript:randomPost()">
<span> </span><i class="fa fa-paper-plane"></i>
<div> 随便逛逛→</div></a>
</div>
|
seamless-card 呼应上文的无缝效果。无边框的关键就在于这!
注意到,
1
| <a id="random-hover" style="width:100%;height:auto;" href="javascript:randomPost()">
|
中的 js 函数为之前写的随机跳转函数 ,你可以执行你想要的函数。
从这个例子中,我们学到,HTML 是实现画面内容,CSS 是实现鼠标悬停动效,widget.yaml 可以配置侧边栏效果。以这种方式我们很快就能做出第二个例子。
Car 小汽车
项目:car (codepen.io)
这个项目里只有 css 代码,那这个页面就简单了。新建 HTML 放入 DO_NOT_render 文件夹。
1
2
3
4
5
6
7
8
9
10
11
| <!DOCTYPE html>
<html lang="zh">
<head>
<meta charset="UTF-8">
<title>小车</title>
</head>
<script>
</script>
</html>
|
widget.yml 几乎不用变:
1
2
3
4
5
6
7
8
9
10
11
12
13
| - class_name: seamless-card
id_name:
name:
icon:
order:
html: |
<div id="effect_shade">
- <iframe id="effect_shade-banner" src="/DO_NOT_render/people.html" frameborder="no"></iframe>
+ <iframe id="effect_shade-banner" src="/DO_NOT_render/car/car.html" frameborder="no"></iframe>
<a id="effect_shade-hover" style="width:100%;height:auto;" href="javascript:randomPost()">
<span> </span><i class="fa fa-paper-plane"></i>
<div> 随便逛逛→</div></a>
</div>
|
就 OK 了。
其他侧边栏定制文章
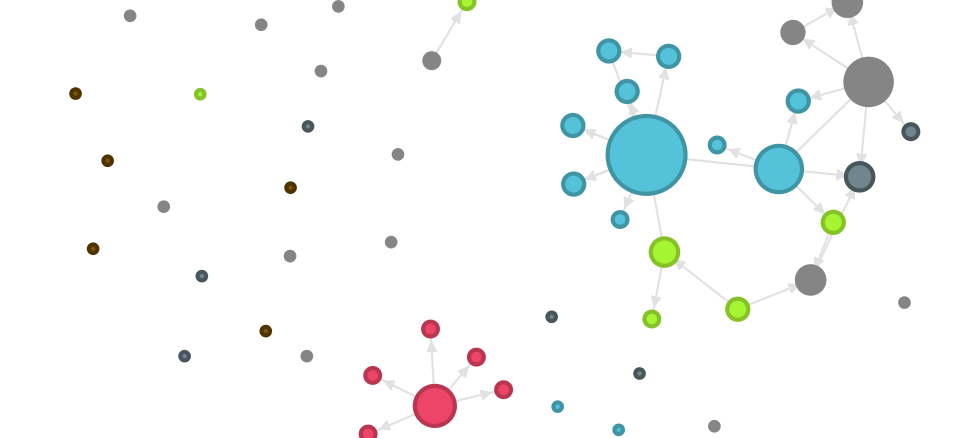
Butterfly 侧边栏实现 Obsidian 关系图谱
本文参考
 微信
微信 支付宝
支付宝